


Aircraft Engravers
151 North Granby Rd.
Granby, CT 06035 USA
Phone: (860) 653-2780
Fax: (860) 653-7324
Email: info@engravers.net
© 1998, 2005, 2020 Aircraft Engravers All Rights Reserved. Contact Webmaster

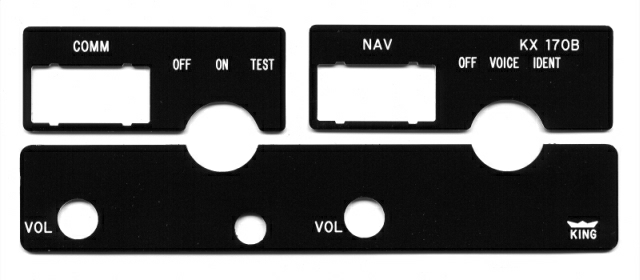
King KX170B Faceplate Inserts
Material - For the two lens sections are made from .032" Matte black/white text. The lower section is made from .020” solid black stock and the text is color filled. All are backed with double faced tape for an easy peel and stick installation. Mouse over image to see installed faceplate.
Price $35.00
NOTE: This item is NOT PMA’d and can NOT be installed in US Certified aircraft unless the proper FAA paperwork is completed. Contact your local avionics shop or AP for more information.

King KX170B Faceplate insert installation directions
Before you begin: Check to see if you received the proper faceplate insert. Are the numbers the same as your radio? Does it fit correctly? Although the holes and text will be the same, many faceplate manufacturers made different widths or heights of the same faceplate. (Just to make life a little more interesting)
- This faceplate insert is NOT PMA’d and CAN NOT be installed in US Certified aircraft unless the proper FAA paperwork is completed. The FAA is very strict on using non-PMA’d parts in certified aircraft. Contact your local avionics shop or AP for these requirements.
- Have this insert installed by an FAA certified avionics shop if the unit is to be installed in a US Certified aircraft. If you do not have all the proper tools, are not a qualified technician or your not sure you are capable of doing this job, seek expert advise.
- DO NOT remove the faceplate from the radio unless you are a fully qualified avionics repair person. You have been for-warned. The gears behind the faceplate MUST be aligned properly to the corresponding window frequencies.
- Remove the knobs. *** CAUTION *** This next operation can be expensive to repair if it is not done correctly! MAKE SURE you are careful not to put any outward pressure on the selector switches. Those switches can only be replaced by an avionics shop! To remove the old inserts, set the selector switches to the OFF position. Use a small hobby knife to score a vertical line through the "ON" & "VOICE" from the top to bottom of the old inserts, this will weaken the old soft aluminum at this point. Use a small screwdriver to get under the old insert and start to pry off the old insert by starting on the corner furthest from the window area. If you must pry against the outer rim area, use a piece of plastic or paper to protect the paint as needed. Bend this piece back and forth at the score line until it beaks off. Repeat on the other side. After removing the fist portion, set the selector switch to the IDENT or TEST position. This will give you clearance to remove the remainder of the old insert without having the selector switch get in your way. DO NOT bend the metal trim ring around the magnifying lens, you will need it later. If your faceplate does not need painting go to #10
- Use tape and paper to protect the open areas where the magnifying lens use to be, the metal chassis and the knob shafts from any paint over-spray.
- Fill any dents with a plastic auto body or a model builders filler.
- Lightly sand with a fine grit sandpaper for good paint adhesion.
- Paint the faceplate and metal knobs with a quality paint such as Krylon's® 1613 Semi-Flat Black paint.
- Remove the protective tape and paper.
- Remove the lens and metal trim piece from the old inserts, be very careful, bend the (4) four tabs AS LITTLE AS POSSIBLE to pass through the hole. Install the lens and metal trim pieces into the new inserts. Bend the tabs back to hold lens in place. Use silicone glue on each tab to hold it in place.
- Remove the double face tape backing from the new inserts.
- Place the new inserts onto the faceplate, being careful to work around the lever. Press firmly all around new insert for good tape adhesion. Reinstall the knobs onto the radio.
- Tell all your aircraft buddies about Aircraft Engravers and the great products we make.

Aircraft Engravers return policy.
We will give you a 100% refund of the purchase price minus any shipping charges for any faceplate that is returned to Aircraft Engravers. This is for any reason that you are dissatisfied or can’t comply with any FAA rules or regulations.

AKA - Also Known As - King KX170B, KX-170B, KX 170B