

Aircraft Engravers
151 North Granby Rd.
Granby, CT 06035 USA
Phone: (860) 653-2780
Fax: (860) 653-7324
Email: info@engravers.net
© 1998, 2005, 2020 Aircraft Engravers All Rights Reserved. Contact Webmaster

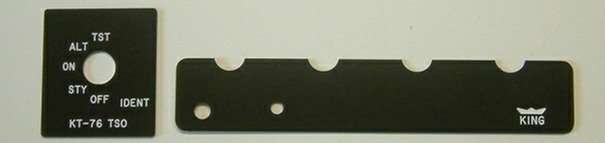
KING KT76 (Style 1 or 2) faceplate insert
Material - The right section is made from .020" Matte black/white text. The lower section is made from .020” solid black stock and the text is color filled for a solid black edge. All are backed with double faced tape for easy peel and stick installation.
Price $18.00
NOTE: This item is NOT PMA’d and can NOT be installed in US Certified aircraft unless the proper FAA paperwork is completed. Contact your local avionics shop or AP for more information.

KING KT76 (Style 1) faceplate insert installation directions
Before you begin: Check to see if you received the proper faceplate insert. Are the numbers the same as your radio? Does it fit correctly? Although the holes and text will be the same, many faceplate manufacturers made different widths or heights of the same faceplate. (Just to make life a little more interesting)
- This faceplate insert is NOT PMA’d and CAN NOT be installed in US Certified aircraft unless the proper FAA paperwork is completed. The FAA is very strict on using non-PMA’d parts in certified aircraft. Contact your local avionics shop or AP for these requirements.
- Have this insert installed by an FAA certified avionics shop if the unit is to be installed in a US Certified aircraft. If you do not have all the proper tools, are not a qualified technician or your not sure you are capable of doing this job, seek expert advise.
- If your faceplate needs painting, remove it from the radio. Otherwise, go to #9.
- Tape up the faceplate to protect it from painting any unwanted areas. These areas include the colored light, knob (unless you want to repaint them too) & window areas. Also tape the backside to protect from any paint over spray.
- Fill any dents with a plastic auto body or a model builders filler.
- Lightly sand with a fine grit sandpaper for good paint adhesion.
- Paint the faceplate with a quality paint such as Krylon's® 1613 Semi-Flat Black paint.
- Remove the protective tape and paper.
- Remove the old text decal with a small screwdriver and/or hobby knife. DO NOT remove the knob, it is not meant to be removed.
- Remove the double face tape backing from the new inserts.
- Place the new inserts onto the faceplate.
- Tell all your aircraft buddies about Aircraft Engravers.
KING KT76 (Style 2) faceplate insert

Aircraft Engravers return policy.
We will give you a 100% refund of the purchase price minus any shipping charges for any faceplate that is returned to Aircraft Engravers. This is for any reason that you are dissatisfied or can’t comply with any FAA rules or regulations.

AKA - Also Known As - KT76, KT-76, KT 76, King Transponder
KING KT76 (Style 2) faceplate insert installation directions
Before you begin: Check to see if you received the proper faceplate insert. Are the numbers the same as your radio? Does it fit correctly? Although the holes and text will be the same, many faceplate manufacturers made different widths or heights of the same faceplate. (Just to make life a little more interesting)
- This faceplate insert is NOT PMA’d and CAN NOT be installed in US Certified aircraft unless the proper FAA paperwork is completed. The FAA is very strict on using non-PMA’d parts in certified aircraft. Contact your local avionics shop or AP for these requirements.
- Have this insert installed by an FAA certified avionics shop if the unit is to be installed in a US Certified aircraft. If you do not have all the proper tools, are not a qualified technician or your not sure you are capable of doing this job, seek expert advise.
- If your faceplate needs painting, remove it from the radio. Otherwise, go to #8.
- Tape up the faceplate to protect it from painting any unwanted areas. These areas include the colored light, knob (unless you want to repaint them too) & window areas. Also tape the backside to protect from any paint over spray.
- Fill any dents with a plastic auto body or a model builders filler.
- Lightly sand with a fine grit sandpaper for good paint adhesion.
- Paint the faceplate with a quality paint such as Krylon's® 1613 Semi-Flat Black paint.
- Remove the protective tape and paper.
- If there is raised text on the bottom section, file or sand it down flush.
- Remove the double face tape backing from the new inserts.
- Place the new inserts onto the faceplate.
- Tell all your aircraft buddies about Aircraft Engravers.