

Aircraft Engravers
151 North Granby Rd.
Granby, CT 06035 USA
Phone: (860) 653-2780
Fax: (860) 653-7324
Email: info@engravers.net
© 1998, 2005, 2020 Aircraft Engravers All Rights Reserved. Contact Webmaster

Cessna Audio Panel W/ Marker Beacon Faceplate Inserts
Material - Made from .020” black with white text. All are backed with double faced tape for easy peel and stick installation.
Price $31.50
NOTE: This item is NOT PMA’d and can NOT be installed in US Certified aircraft unless the proper FAA paperwork is completed. Contact your local avionics shop or AP for more information.
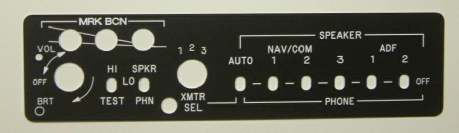
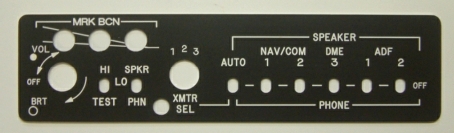
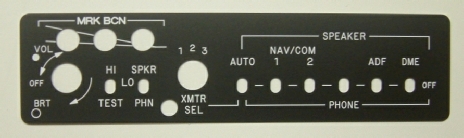
The text at the last 3 switch positions to the right are what determines which faceplate is needed.

Cessna Audio Panel W/ Marker Beacon installation directions
Before you begin: Check to see if you received the proper faceplate insert. Are the numbers the same as your radio? Does it fit correctly? Although the holes and text will be the same, many faceplate manufacturers made different widths or heights of the same faceplate. (Just to make life a little more interesting)
- This faceplate insert is NOT PMA’d and CAN NOT be installed in US Certified aircraft unless the proper FAA paperwork is completed. The FAA is very strict on using non-PMA’d parts in certified aircraft. Contact your local avionics shop or AP for these requirements.
- Have this insert installed by an FAA certified avionics shop if the unit is to be installed in a US Certified aircraft. If you do not have all the proper tools, are not a qualified technician or your not sure you are capable of doing this job, seek expert advise.
- If your faceplate does not need painting go to #10, Remove the knobs, the faceplate electrical power leads, the instrument panel lock down screw and the four screws holding on the faceplate.
- Tape over the marker beacon light areas (the 3 colored circles) to protect them from being painted. Do not tape the inner side of the border as this has to be painted also. Don't forget to tape the back from any paint over spray.
- Fill any dents with a plastic auto body filler or similar material.
- Lightly sand smooth with a fine grit sandpaper for good paint adhesion.
- Paint the faceplate with a quality paint such as Krylon's® 1613 Semi-Flat Black paint. If you want a silver border around the outer rim use a Testors' silver paint stick. They are found in most hobby stores.
- Remove the protective tape.
- On the original faceplate there is a thin plastic membrane that has the text, graphics and the 3 marker beacon light areas. This old membrane has to be removed while keeping the marker beacon light area in place. This will allow the new faceplate insert to be lit properly. Use an X-acto® hobby knife to cut an rectangular shaped area around the 3 marker beacon lights 1/4" larger than the circles, this 3 light area stays in place. Remove the remaining membrane. This will let the light for the other text to show through the new insert and for the marker beacon light area to stay attached to the faceplate.
- Remove the double face tape backing from the new insert.
- Place the new inserts onto faceplate. Reinstall the faceplate, knobs, instrument panel lock down screw and faceplate power leads onto the radio.
Style #1 |
|
|
Style #2 |
|
|
Style #3 |
|
|
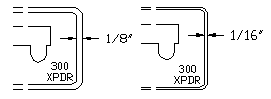
Border widths. Most (95%) have the thinner width border |
Note: This radio trim border comes in two widths, to determine the correct faceplate needed, measure the faceplate trim border as shown in the drawing. If it is approximately 1/8" wide, order the small insert or if it is approximately 1/16" wide then order the large insert.

Aircraft Engravers return policy.
We will give you a 100% refund of the purchase price minus any shipping charges for any faceplate that is returned to Aircraft Engravers. This is for any reason that you are dissatisfied or can’t comply with any FAA rules or regulations.

AKA - Also Known As - To our knowledge there isn’t a model number for these units, they are known as Cessna Audio Panel W/ Marker Beacon, the text at the last 3 switch positions to the right are what determines which faceplate is needed.